I have been blogging for myself and other businesses for more than a decade. In fact, blogging helped me earn my first paycheck. And over the years, it has helped me land more clients for my business.
People often ask me, “How to create a blog?,” “How to become a blogger?,” or “How to start blogging?”
When I first started learning to blog, it was not that simple. I had to search dozens of queries in search engines and scour multiple sites to find the information I needed. Luckily, for you, I have distilled my years of experience in this one detailed guide.
We’re going to cover what a blog means, why build a blog or website, and all the steps you need to start a blog, even if you don’t have any technical expertise or background.
Disclaimer: If you buy any products through links on this site, I may earn a commission. But it doesn't make any difference to your cost, and it helps me keep this blog running. So you could always read my articles for free.
What is a blog?
In simple terms, a blog is a website optimized for content consumption, not direct selling. Each piece of content/article you write for a blog is called a blog post, or a blog entry.
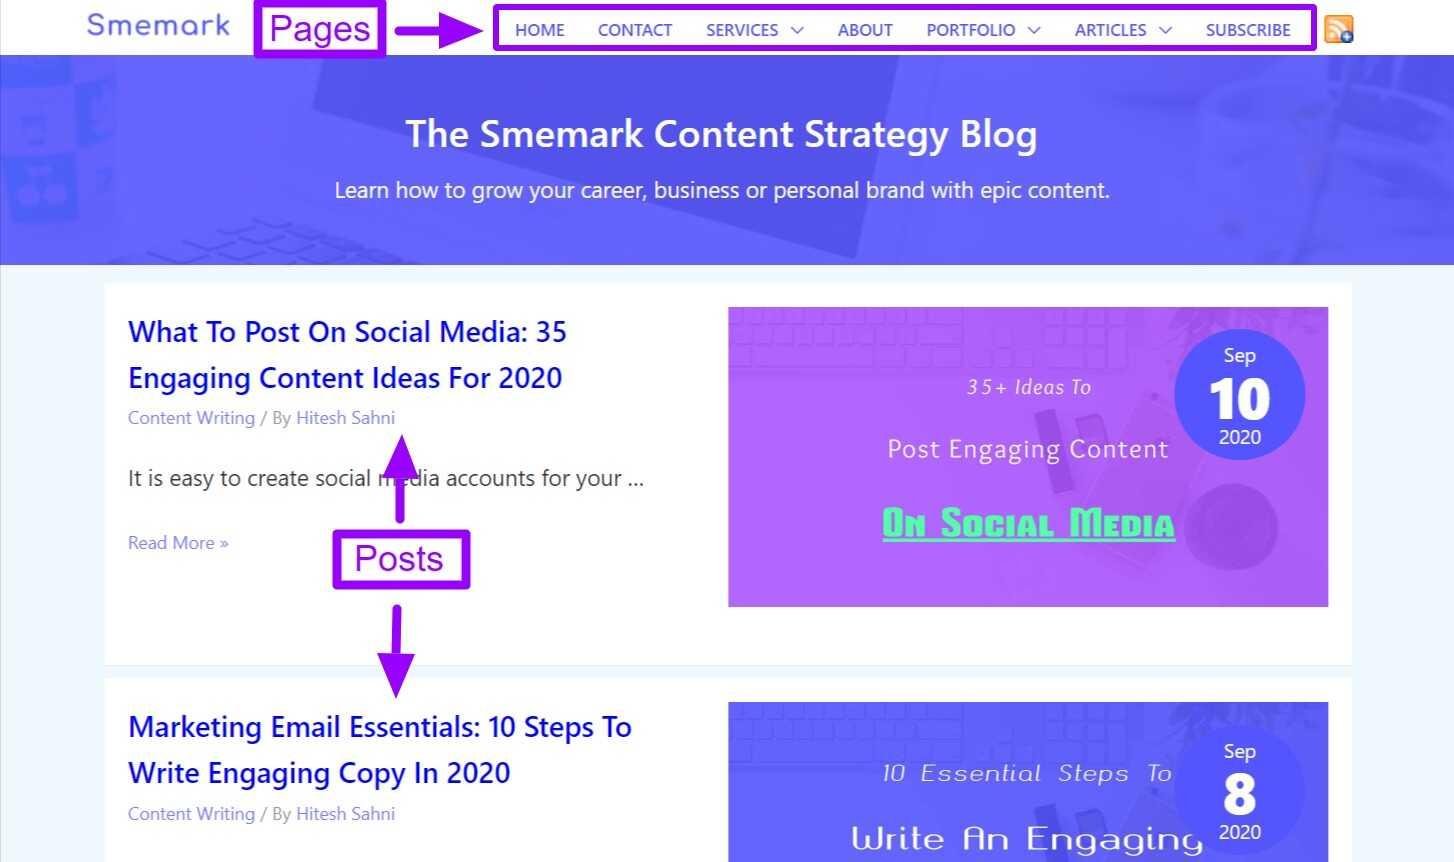
Content in a blog is usually archived by date, so the latest articles show at the top, followed by the ones published before, and so on. As such, a blog is a collection of blog posts sorted by date.
Why start a blog?
A blog can be one of your greatest assets, whether you want to spread the word about your brand, build an influence, teach people how to do something, generate leads, or sell a product/service via content marketing.
The idea behind starting a blog is to write and share content that educates, inspires, or entertains. The aim is to attract and build a trustworthy, long-term relationship with your audience. Setting up a blog can help you in a number of ways, depending on your goal.
Grow your brand/business
Other than helping your readers achieve their goals, your blog content will also turn some of them into leads and nurture them towards your product or service. That’s how you’ll be able to sell and make more money by creating a blog.
Make money from home
Many bloggers make a full-time income through blogging. Of course, it takes work, but is a great opportunity nevertheless if you keep at it.
Become an influencer
Blog creation lets you showcase your expertise and thought leadership, reaching people in your industry. So it has the potential to lead to new consulting projects, book deals, speaking engagements, and more.
Overall, a blog is an online platform to build a digital presence totally in your control. By setting up a blog, you’re also avoiding the risk of depending on platforms outside of your control, like Facebook or Instagram.
Steps to start a blog
Starting a blog is quick, cheap, and easy. But tweaking and optimizing the little things can take as much time and money as you want it to.
So as you go through these blog creation steps, don’t worry too much about the look and feel of your blog or website. It can always be customized later.
Pick a blog niche
Before you start a blog or website, it’s important to be clear on the primary topics you’ll write about, and the primary audience you want to target. A niche is a combination of two things:
- The specific subject area you decide to write about
- The audience you intend to target
For example, Dale started a new blog right after the pandemic began in February 2020. This was good timing, as her previous blog was in the travel niche, and the pandemic had wiped out people’s interest in traveling.
The new blog’s niche was college lifestyle, covering topics related to dorm room, gift guides, and college life.
She earned over $8400 from this blog within the first nine months alone. So picking the right niche for creating a blog is crucial.
Choosing the right niche before you start blogging is a huge topic in itself and deserves a separate guide, but I’ll give you a quick summary here. During blog creation, you want to pick a subject that meets the following criteria:
- You have a lot of knowledge or skill in that area.
- It’s something you’re passionate about teaching others.
- There are enough people interested in learning about it.
- There is no competition, or you can write better content than theirs.
All these conditions are important to your success with blogging. If you know a lot and are passionate about a subject, you’ll be able to write dozens of articles on it month after month.
A blog needs a lot of content to pick up and build an audience. In addition, you need to analyze market demand and competition. You don’t want to write about something for weeks after starting a blog before you realize no one cares.
However, if you pick a subject that many people are interested in, you will most certainly have competition—other bloggers writing about the same thing.
In that case, you want to make sure your niche is such that you can beat the competition with better content and overall user experience.
Develop your blog content strategy
Do you know why the majority of blogs fail and quit within a few months? It’s because the people behind them are winging it.
When starting a blog, they don’t have any specific goals or audience, or what they will write about in the next 6-8 months and how often. They have no blueprint for how they plan to get traffic and unrealistic expectations on how long it will take.
In other words, they don’t have a concrete content strategy. Don’t let that be you.
A survey by CMI shows that 60% of most successful marketers have a documented content strategy. So before you start blogging, make sure you have at least a decent plan on how you will make your blog a success.
Your content strategy will help you be prepared in advance with things like:
- Your unique value proposition and elevator pitch
- Your blog’s headline and sub-headline
- The main niche, topics, and subtopics you’ll write about
- The pain points/problems you are addressing
- Your ideal customer persona
Having such a living and breathing document will ensure that everything you do is part of a bigger plan. To learn more, refer to our content strategy guide.
Register a domain name
A domain name and web hosting package are essential for starting a blog or website. We’ll first talk about domains, and we’ll cover hosting in the next section.
So what’s a domain name?
It’s a string of text which refers to your location on the web. No one can find and come to your home without your address (I hope). Similarly, people need to type in your domain name to access the blog you created.
For example, the domain name for the website where you are reading this article is hypegig.com. And to reach this page, you either typed the domain name in your browser or clicked on a link associated with this domain name.
A domain name is usually the same name as your brand. So essentially, you’re not just picking a domain name, but a name for your brand. It’s how people will see, recognize, and remember you.
Some people prefer to use their own personal name as the name of their brand and domain. For example, popular blogger Amy Lynn Andrews started blogging at amylynnandrews.com.
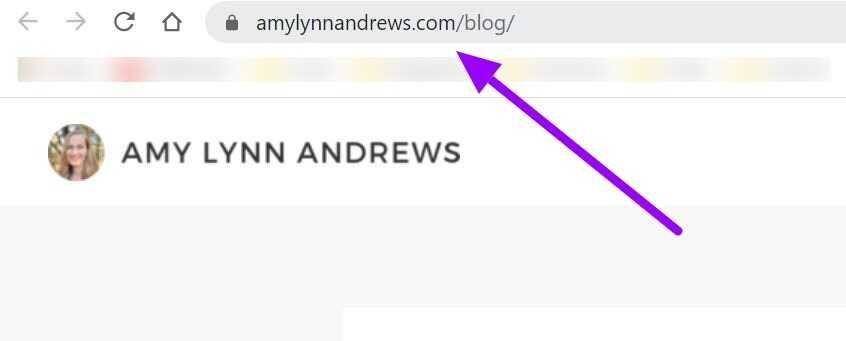
If you’re trying to build a personal brand and want to be known for something specific, maybe you might like this approach for blog creation.
The only downside to this is that once you have come to be known for expertise in a specific niche, you cannot go into another vertical if it’s totally different from what you’ve built your reputation for.
On the other hand, having a brand name different from your own name allows you to go into other businesses and target different markets. This is because you can pick a unique brand name for each vertical you go after.
Once you have chosen a great name to start a blog, the next step is to purchase from a reputable domain registrar. A domain name registrar is a company authorized to sell domain names.
Now, some guides will tell you to skip this step and go straight to hosting providers. Because some hosts also let you purchase domain names as well.
In fact, they often have deals where you can get a domain name for free for the first year of hosting. And you get the convenience of managing your domain and your hosting from the same place.
So why on earth am I telling you to buy a domain first from a separate company to start a blog? Why am I making things more complicated for you?
In an ideal world, things will also go as expected, and you’ll get great service from your hosting provider. You’ll be so happy that you would never want to switch hosts.
But we don’t live in an ideal world. As you grow your blog, your hosting provider may not be a good match for your new requirements. Or the host may make certain changes to their infrastructure that lower the uptime and quality of service you get after you start blogging.
When that happens, it’ll be easier for you to switch to a new host when your domain is secure somewhere else. Trusting one company with both your domain and hosting is not a good idea.
So where to buy a domain name for starting a blog? One of the most trustworthy companies in this regard is NameCheap, which is also what I use and recommend.
To purchase a domain name, go to Namecheap’s domain name search, and type in the domain name you picked.
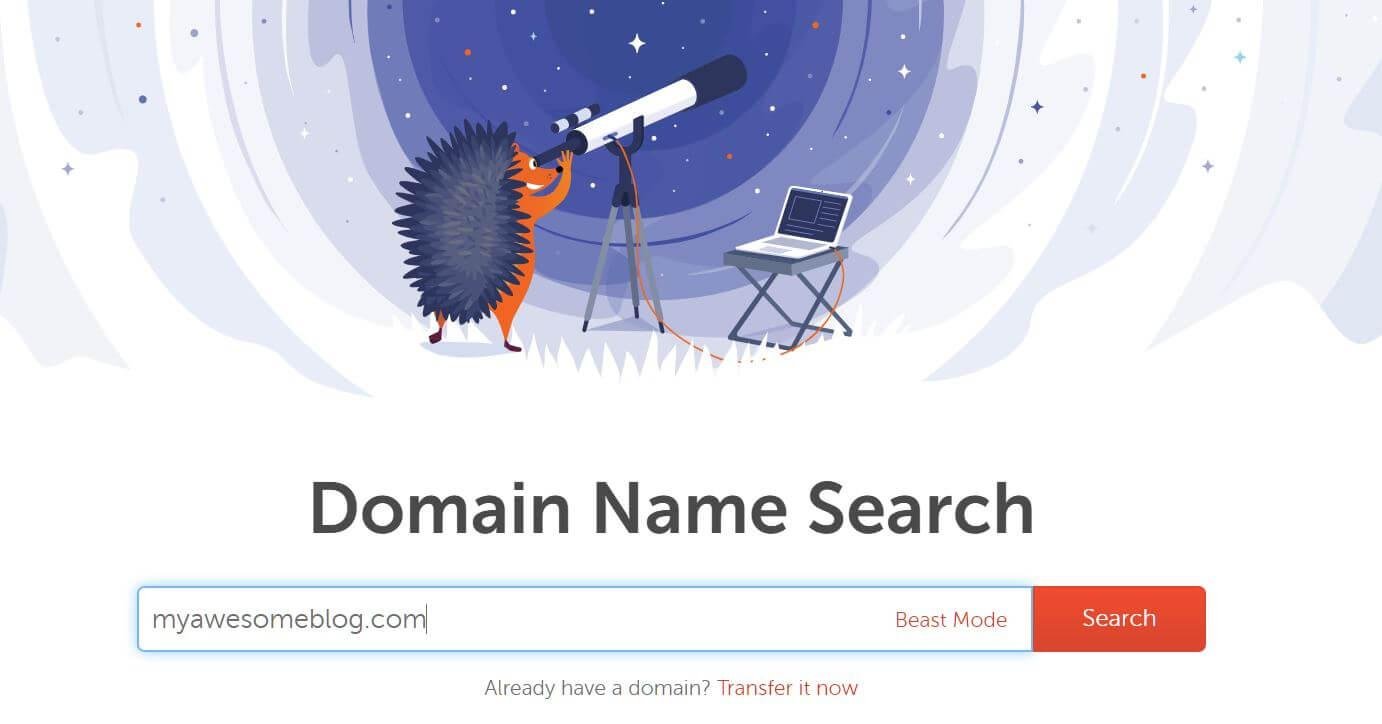
Hit Search. If the domain name is available, add it to your cart, create your Namecheap account, and complete the checkout process.
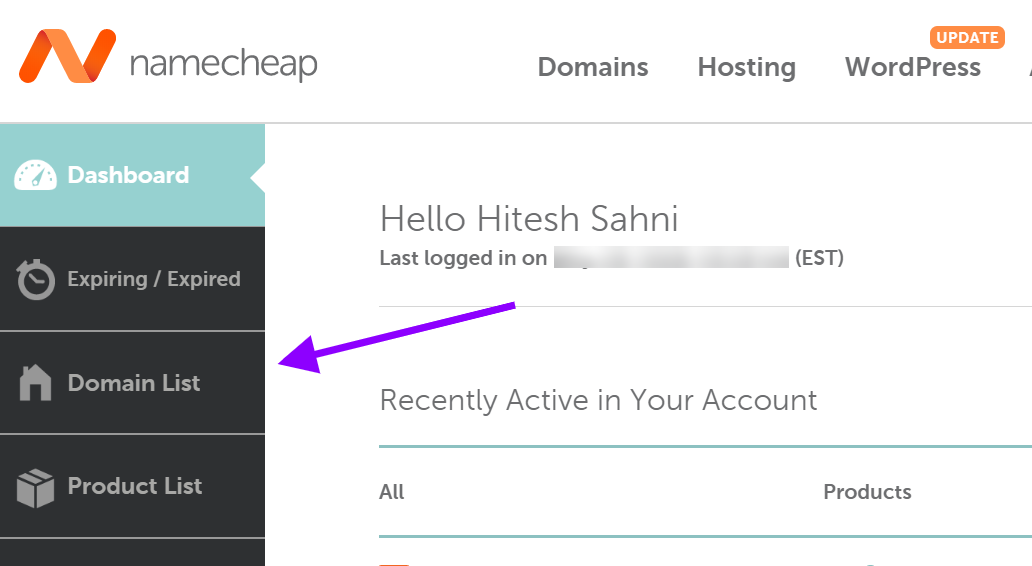
Within seconds, the domain name will become available in your Namecheap account. You can now view and manage your purchased domain name by logging into your Namecheap dashboard and clicking Domain List on the left.
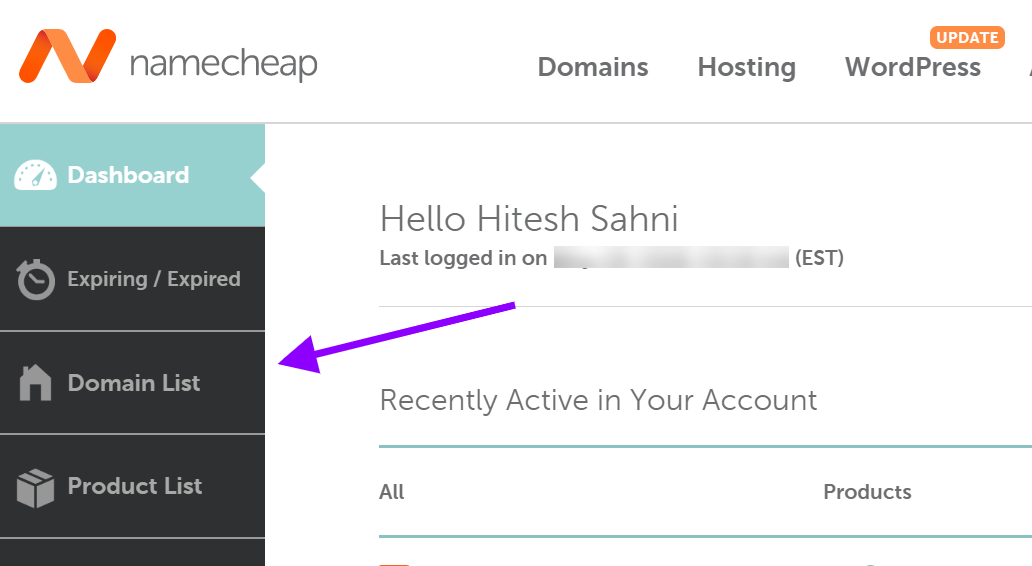
Just remember how to do this for now because after you buy hosting, we’re going to need to make a small change in your domain settings.
Pick a blog host/website builder
In the previous step for blog creation, I said your domain name is like an online address of your blog, similar to how there is an address for a physical location in the real world.
But just the address is not enough. In the real world, you cannot have a home or physical business without renting or owning a space. This space is what you set up as your house or office, and where you keep your assets.
In the same way, you cannot start a blog online without having some kind of space to keep the files associated with that blog or website.
This service is referred to as web hosting, and the companies which provide this service are called web hosts.
Now that you know what web hosting is, you should also know that it’s not the same thing as a website builder. A website builder is a piece of software that lets you create your blog or website without coding.
Then why am I clubbing both web hosting and website building in the same step? Because they have started venturing into each other’s territory. Many blog hosting companies these days also offer a built-in website builder.
Similarly, many website builders also provide hosting. So it makes sense to pick both your options simultaneously.
This is an important decision in the blog creation process and not the time to be stingy. You may feel tempted to purchase from whoever offers the most economical package, but avoid this trap.
If you pick the wrong web hosting to start a blog, you are likely to experience issues like site crashes, slow loading, security breaches, or poor support.
So you must pick a reliable host or website builder with a good reputation, user experience, and customer support. However, you will obviously consider your budget.
What I use and recommend is a combination of Hostinger for hosting and the WordPress website builder. The benefit of this combo is that you’ll be paying only for hosting, since WordPress is a free website builder.
In my experience, here are some of the main advantages of choosing Hostinger for blog hosting:
Affordable pricing: Hostinger offers some of the most budget-friendly hosting plans available for you to start a blog, making it accessible for beginners or bloggers on a tight budget.
Fast loading speeds: Known for its LiteSpeed caching, Hostinger ensures quick load times, improving user experience and potentially boosting search engine rankings.
User-friendly interface: With a simple, intuitive control panel, even beginners can easily navigate Hostinger’s interface to manage their blog without a steep learning curve.
Global data centers: Hostinger has data centers worldwide, allowing you to choose a server location close to your audience for improved performance.
One-click WordPress installation: Setting up a WordPress blog on Hostinger is quick and straightforward with its one-click installation feature.
Free weekly backups: Hostinger includes free weekly backups, so you can restore your blog if something goes wrong.
High uptime guarantee: With a 99.9% uptime guarantee, Hostinger ensures your blog stays available and accessible to readers.
Hostinger’s combination of performance, affordability, and user-friendly tools makes it a solid option for bloggers looking for a reliable hosting provider.
To purchase hosting from Hosinger to start a blog, go to Hostinger’s WordPress hosting page and pick one of the hosting packages available. Then complete the checkout process.
If the interface asks to buy a domain name, pick the option through which you can convey that you already have a domain and enter that domain name.
The checkout page may try to sell you a bunch of additional services, but you don’t need any of them as of now to start a blog.
At this point, you’ll get a welcome email from Hostinger with details on your hosting package. Keep this email handy as it also contains information about nameservers, which we need for the next step.
However, if you don’t get an email, or can’t locate nameserver details in the email, no need to panic. In the next step to start a blog, I’ll show you where to find this information in your Hostinger hosting account.
Connect domain and hosting
If you have followed the steps so far, your domain name is on Namecheap, and your hosting is on Hostinger. Now, you want people to be able to access your Hostinger website by typing in your domain name.
This means you’ll need to connect the website available at Hostinger with the domain name available at Namecheap.
You can do that pretty easily. First, you want to log in to your hosting account and look for information on nameservers.
This information is also included in the welcome email when you purchase hosting from a company to start a blog or website. But if you can’t find it in your inbox, let me show you the steps to get these details from your Hostinger account.
On your Hostinger dashboard, click Websites in the left navigation bar. This will open a page that shows a list of websites hosted in your account. Then click Dashboard next to your website name.

You’ll reach your website dashboard, where you’ll see another menu on the left sidebar. In this sidebar, find the option Hosting Plan -> Plan details. Then scroll down to the nameservers section.

Look for the URLs mentioned in current nameserver 1 and current nameserver 2. Those are what we need.
You can either keep this window open or copy these URLs in a plain text editor for now, like Notepad.
Next, log in to your domain registrar, which in our case, is NameCheap. In the navigation menu on the left, click Domain List.
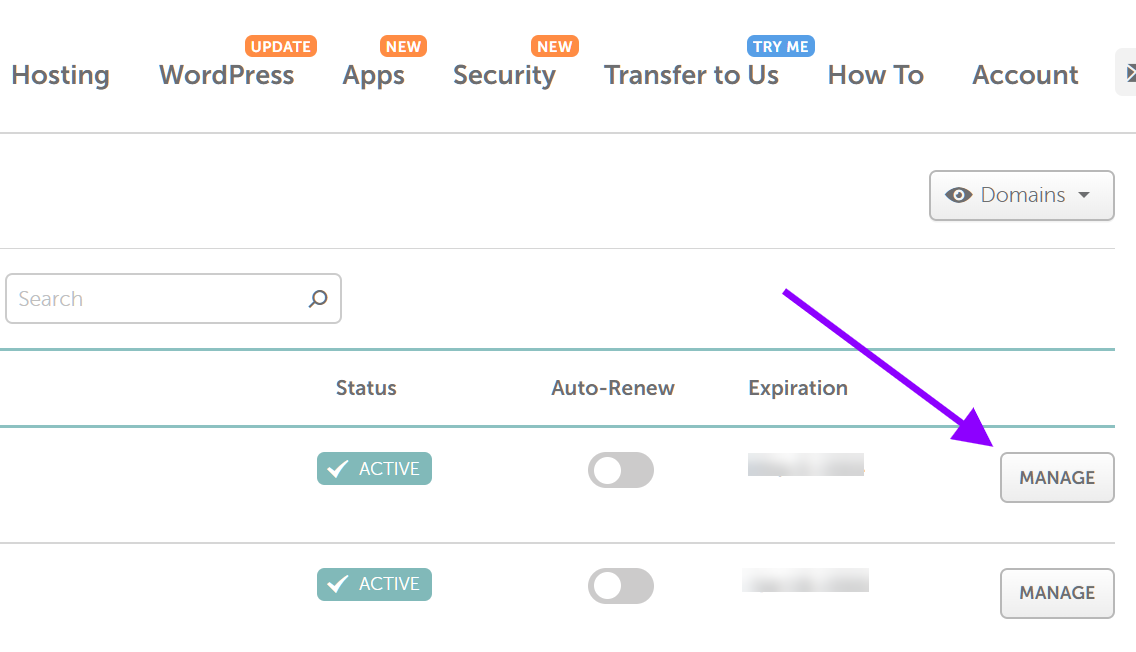
For each domain in your account, you’ll see a button Manage on the right. Click to view the domain management page.
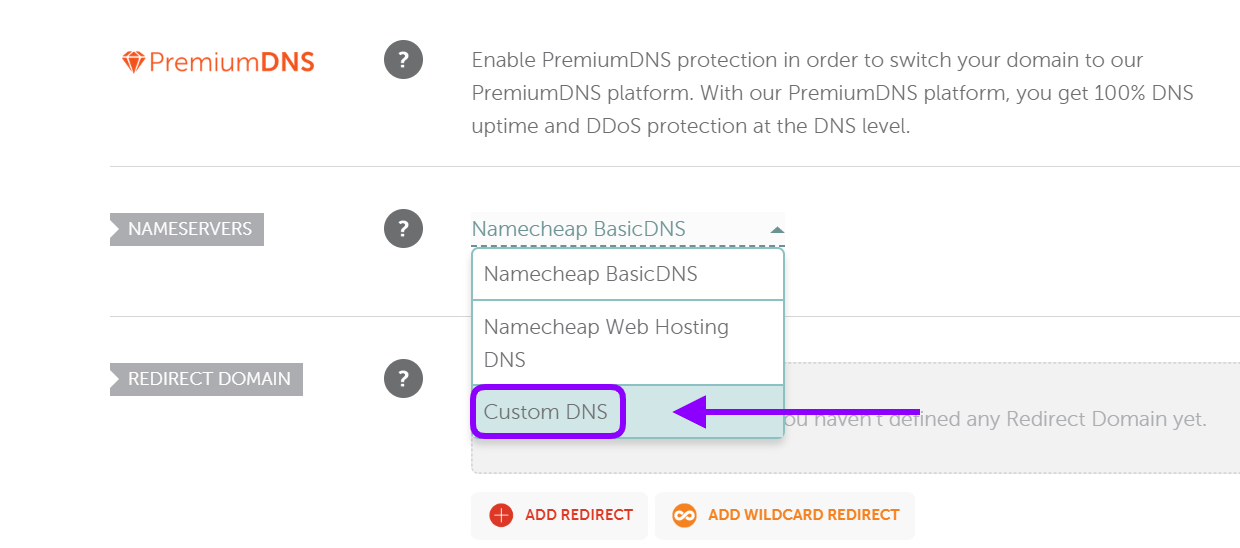
On the domain management page, scroll down to the section NameServers. And from the dropdown menu, select Custom DNS.
You will now see two blank fields. Copy and paste the URLs we got earlier from the hosting account.
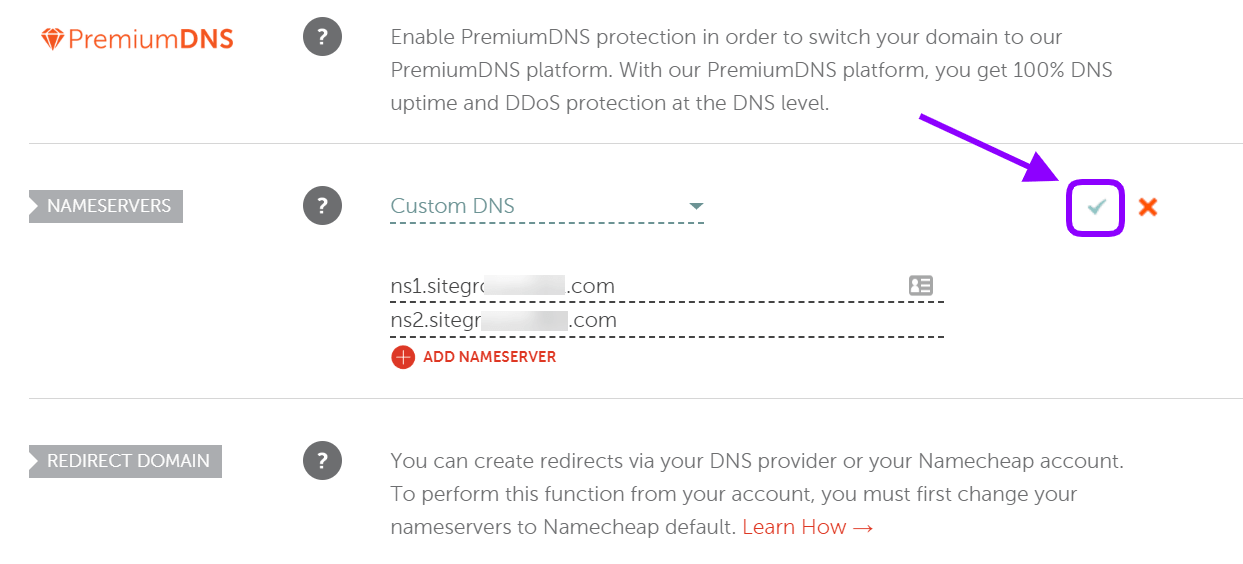
Then click the green tick icon to save your changes. That’s all you need to do to connect domain name and hosting when starting a blog. Note that once you’re done, it may take up to 48 hours for these changes to take effect.
Set up WordPress
As discussed before, we are going to use a combination of Hostinger and WordPress to start your blog. So far, we have discussed all about hosting. Now, it’s time to set up WordPress.
Software like WordPress are known as content management systems, or CMS. We use a CMS because it’s a no-code website builder. It gives you an easy framework to build, manage, and publish the pages of your blog (without writing code).
When it comes to choosing a CMS to start a blog, there are many popular options. But WordPress by far is the most popular, powering 43% of all websites online. On top of that, it’s free and open source.
To start using WordPress, you’ll need to install it in your hosting account. The instructions for installing WordPress may vary depending on your hosting company.
But if you have chosen a good, reputable host like Hostinger for your blog’s creation (as shown above), it’s really quick and easy. Because most of the well-known hosts support one-click installation of WordPress without any hassle.
We are going to go over the steps in Hostinger. Even if you’re using any other host, a lot of these steps will be similar. If you’re still having issues, check documentation or get support from your hosting provider.
In your Hostinger account, navigate to Website → Auto Installer. Under WordPress, click Select.
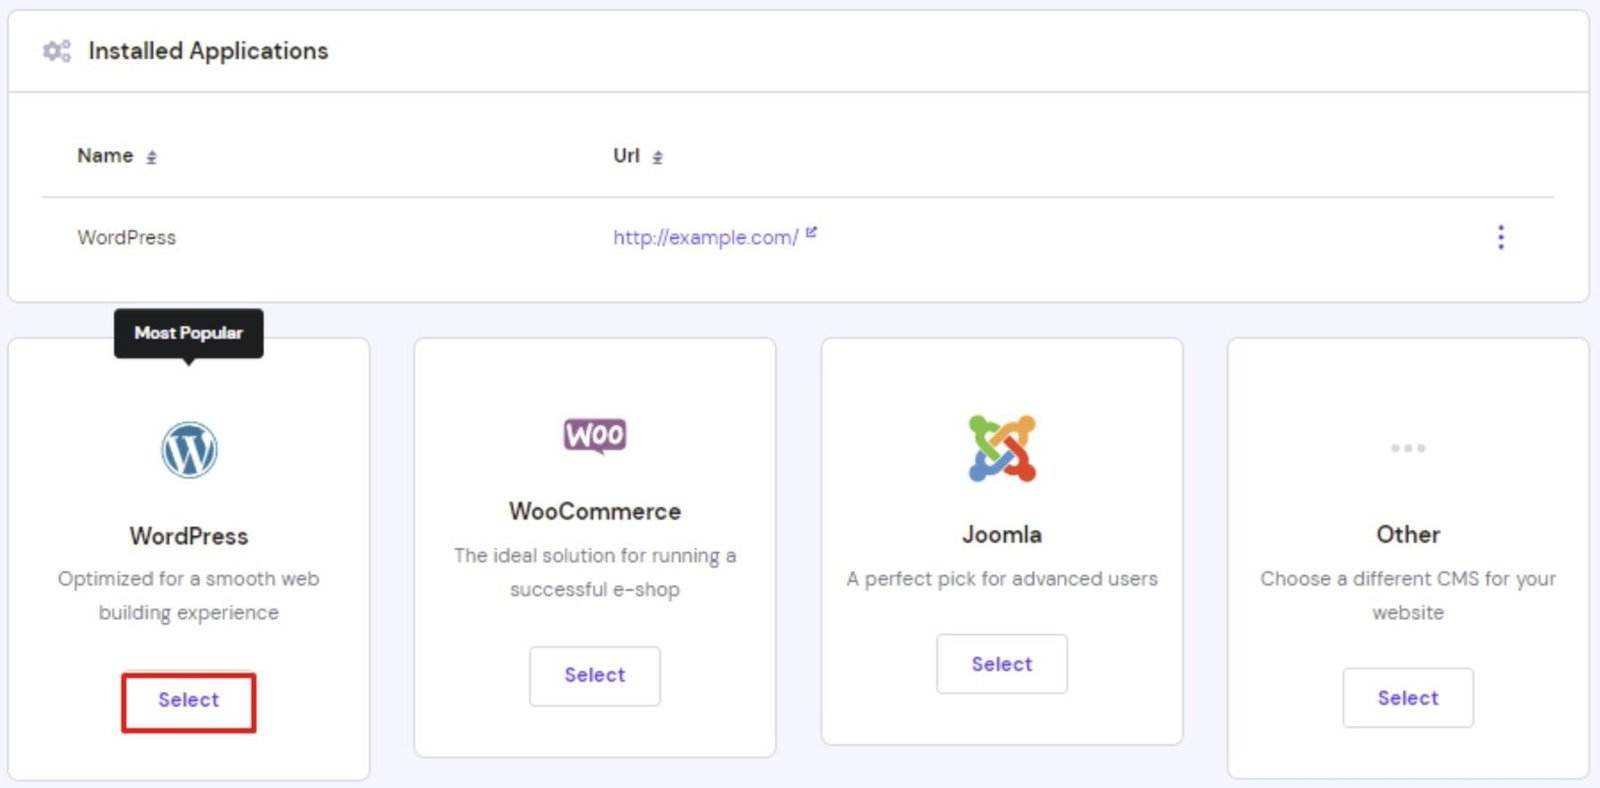
A new window will pop up. Fill in the form with the following details:
- Check that your domain name is correct.
- Type in the administrator username, password, and email. This login information will be used to access your WordPress dashboard or admin area.
- Enter your website title – you can input the blog name here. It’s possible to change this later.
Click Install. Once the WordPress installation is complete, you can go ahead and type your domain name in your web browser, and you’ll see that your blog or website is live, with a default design and some content already in place.
Now you’re ready to start using WordPress to customize and start your blog or website.
Whenever you want to make any modifications to your website, you’ll always start with the WordPress admin dashboard. To log into your WordPress admin dashboard, head over to yourdomain.com/wp-admin.
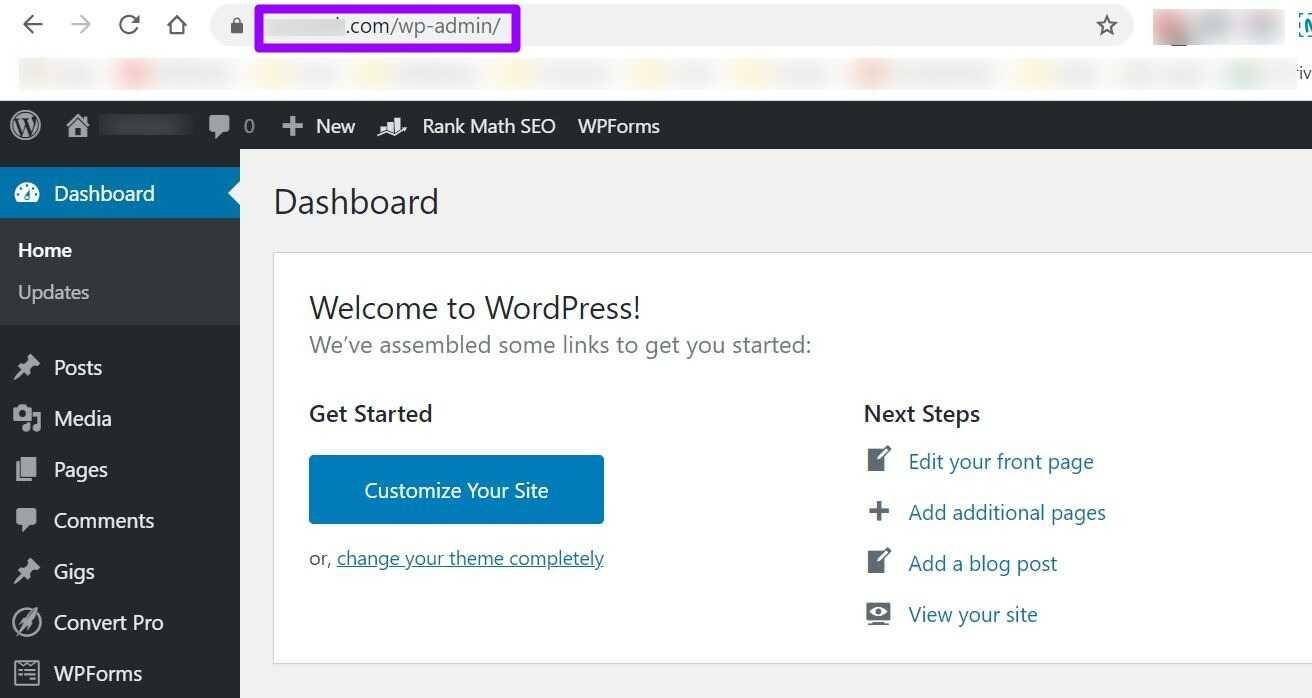
For example, if your domain name is myblog.com, type in myblog.com/wp-admin. Then enter the username and password you provided when installing WordPress.
Once you have reached the WordPress admin dashboard, you’ll see the major options you have in the left-sidebar menu. When you click a section in that menu, the settings for that section will appear on the right.
Configure basic WordPress settings
The next step in starting a blog is to start customizing your website’s look and feel. However, we need to take care of some basic settings first. So, log in to your WordPress admin dashboard as explained above.
How WordPress is configured by default is mostly right, except for these little changes which will help you get started on the right foot.
Hide Top Toolbar – When starting a blog or website, you’ll often want to see how your website looks. But there is always a black toolbar at the top which is only visible to the admin, which means you.

Though it’s useful for returning to settings in your WordPress dashboard, I personally find it annoying. So I usually disable it on any WordPress site I manage.
If you’d like to do the same, click Users > Profile from the left menu in your WordPress dashboard.

Then uncheck the checkbox that says Show toolbar when viewing site.
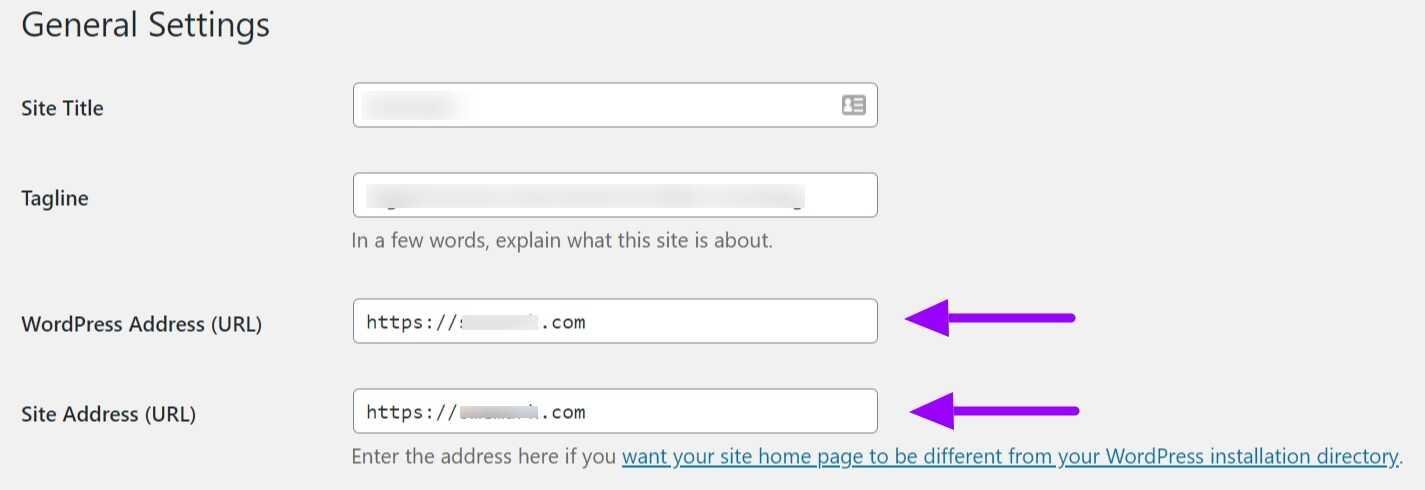
Ensure proper site name and URL – From the left sidebar menu, click Settings. On the General Settings page, make sure the WordPress address and Site Address have the same proper, domain name as you intend.
Change permalink setting to Post Name – When you publish a post or page using WordPress, it’ll get a unique URL address for people to access it.
For example, let’s say you create a blog post about cough remedies. When you publish the post, its URL may look something like this:
The part after the slash – “p9859” – is known as a slug in WordPress terms. Every post or page you create with WordPress will have its own unique slug.
And as you can see, the slug p9859 is hard to remember and bad for the user experience.
That’s why you need to configure WordPress to avoid creating slugs like this. Instead, it should create user-friendly URLs like this:
As explained, in this case, the term “cough-remedies” is the slug. And it’s better than p9859 for readability and SEO.
To create a blog post or page with better URLs, go to Settings > Permalinks from the left sidebar menu in your WordPress dashboard.
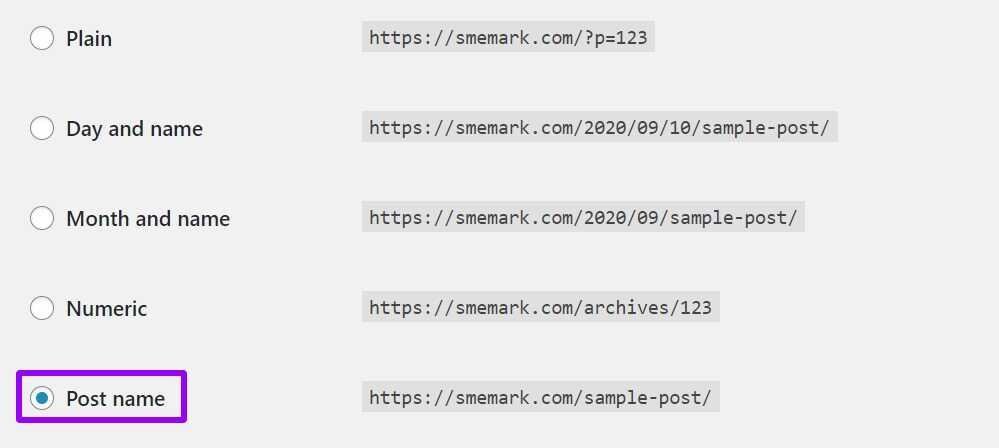
Then from the options provided, select Post Name. This will ensure that the URL slugs are based on the title of your posts and pages. And you’re all set.
Configure a WordPress theme
While WordPress lets you create, edit, manage and publish your posts and pages, it doesn’t determine the design and general look and feel of those pages.
The appearance of your website layout, header, footer, and sidebar come from a theme.
If you noticed, even now your website is looking a certain way. But that’s not by accident. When you install WordPress, it comes bundled with a default theme, which causes your blog to look like what it is.
But you would probably want to create a blog which looks somewhat different. And for that, you would need to install a new theme. Then, you will activate the new theme instead of the default theme.
Just like several skins/wallpapers are available to change the look and feel of your smartphone or computer, there are thousands of WordPress themes available to choose from for your blog or website.
To install a new WordPress theme before you start blogging, click Appearance > Theme from the left menu in your WordPress dashboard. On the Themes window, click the Add New button.
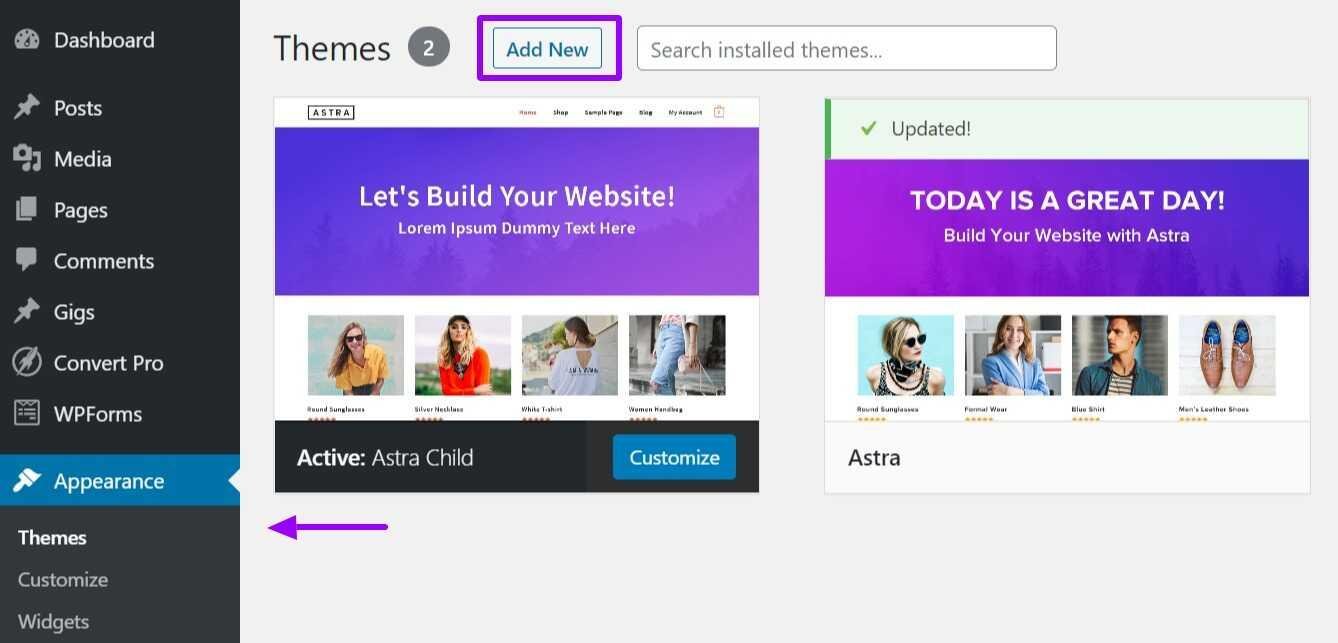
On the Add Themes window, you’ll see thousands of free themes you can choose from to install for your blog or website. You can also preview a theme before installing it, and use the search box to find a theme you are familiar with.
For beginners starting a blog, my top recommendation is the Astra theme. Another safe choice is GeneratePress. In fact, 9% of the 23 million sites using WordPress use the Astra theme, and around 2% (487,000) use GeneratePress.
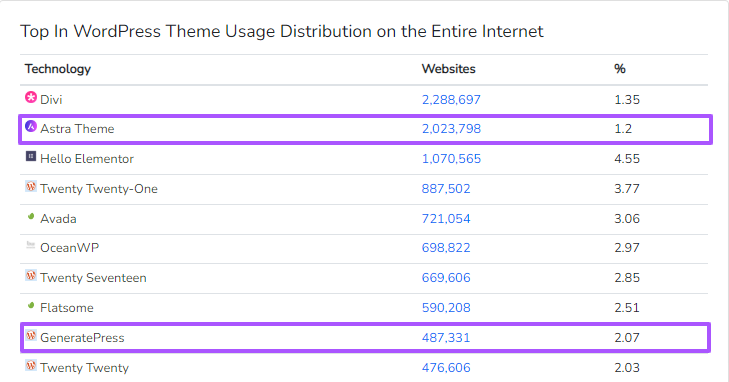
Don’t worry about how they look in the preview. Both these themes are highly customizable, so you can easily change them however you wish even after you start blogging.
Why only these two themes and not others?
Most themes — especially the free ones — are likely to be sloppily designed or not very customizable. They may also have security holes that could compromise your blog, which is concerning for anyone starting a blog.
I have personally used both Astra and GeneratePress. So I can vouch for them. To install either of them, you can search or scroll down to it and click Install.
Note that installing a theme will not activate it. Once a theme is installed, you’ll need to click Activate to apply it to your blog or website.
Now that the theme is in place, we can start customizing it. From the left-sidebar menu in your WordPress dashboard, go to Appearance > Customize.
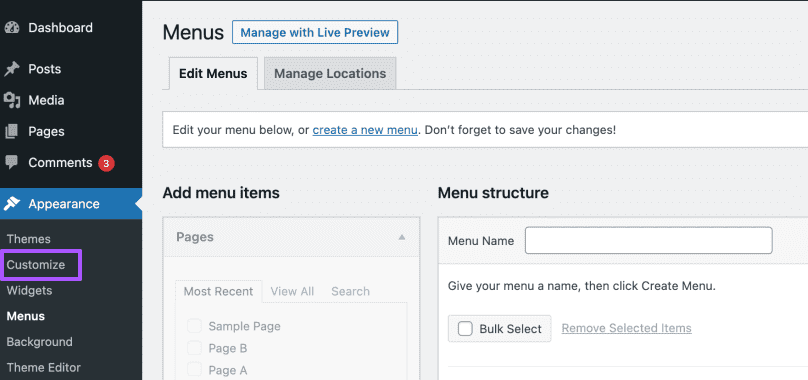
Here you will see plenty of options to change the layout, colors, and more elements that are part of your theme.
However, it may take some time to play around with different options to make your blog look good.
The good news is there is an alternative. If you’re using the Astra theme, you can easily and quickly start a blog or website that looks like it was designed by a professional.
The Astra theme comes with ready-made designs called Starter Templates. These templates are great for beginners, as they allow them to create a nicely designed blog or website with a few clicks.
From the left sidebar menu in WordPress, go to Appearance > Astra Options. Then in the right sidebar, click Install Importer Plugin.
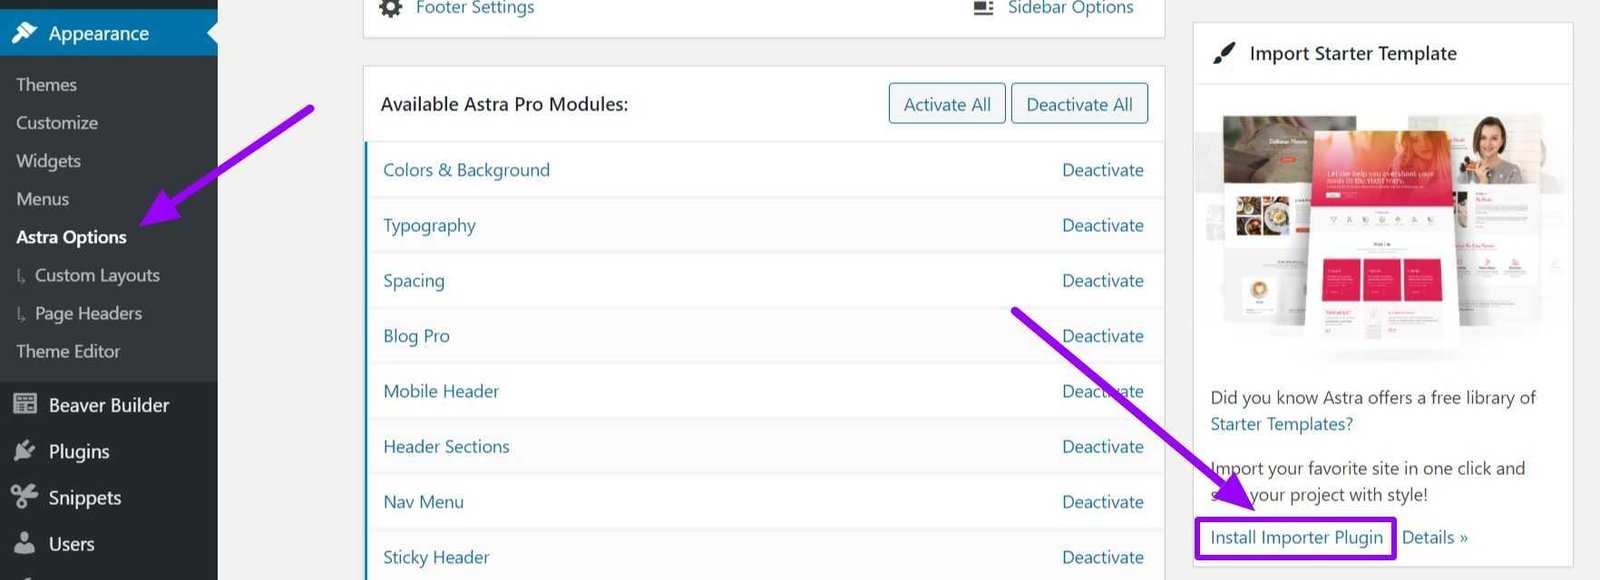
On the Select Page Builder window, pick Gutenberg. Gutenberg is a page/post editor that is part of WordPress by default. The other options will require a separate plugin.
If you see the list of templates instead, just make sure Gutenberg is selected in the top right corner.
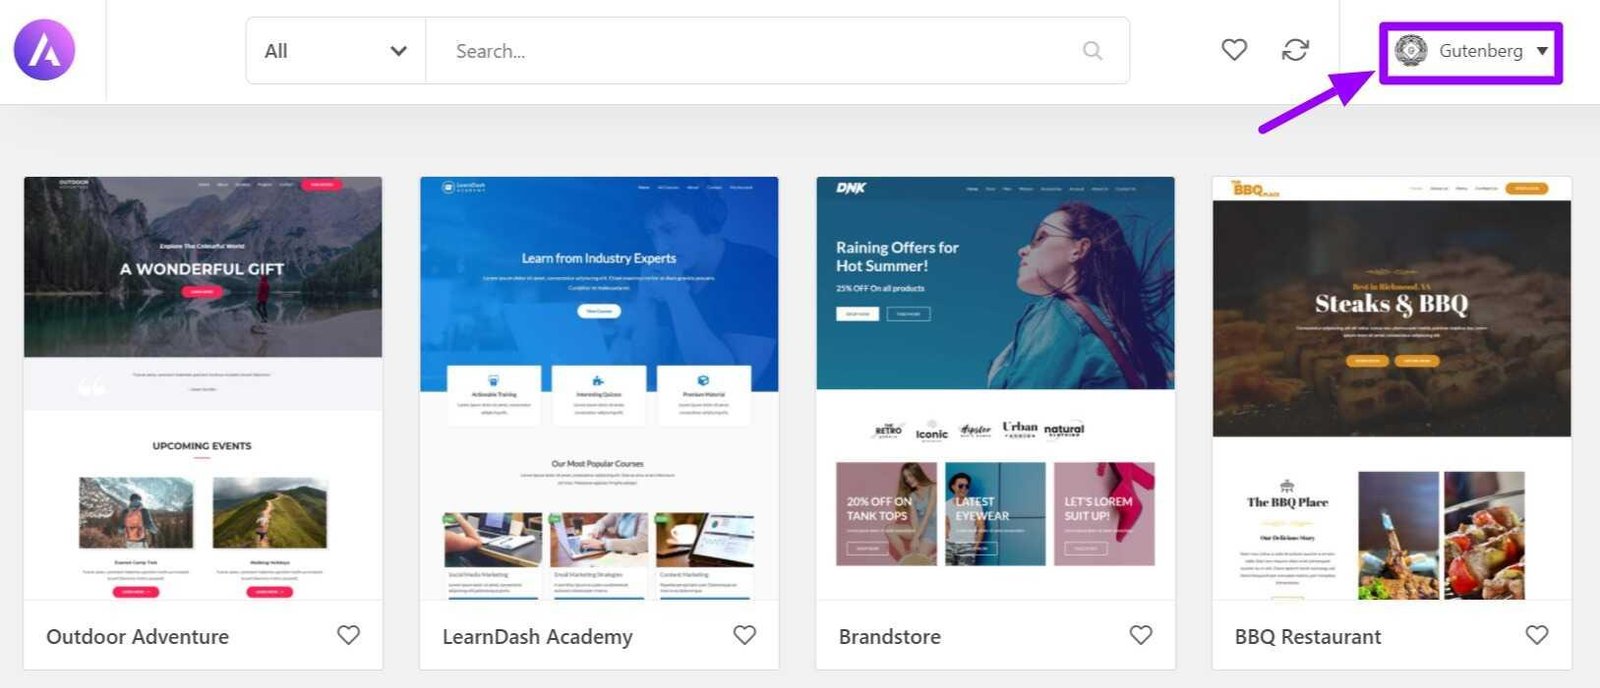
As you browse the available templates, you can click any of them for a preview. When you find something you like, click Import Complete Site. On the next screen, check all the boxes and click Import.
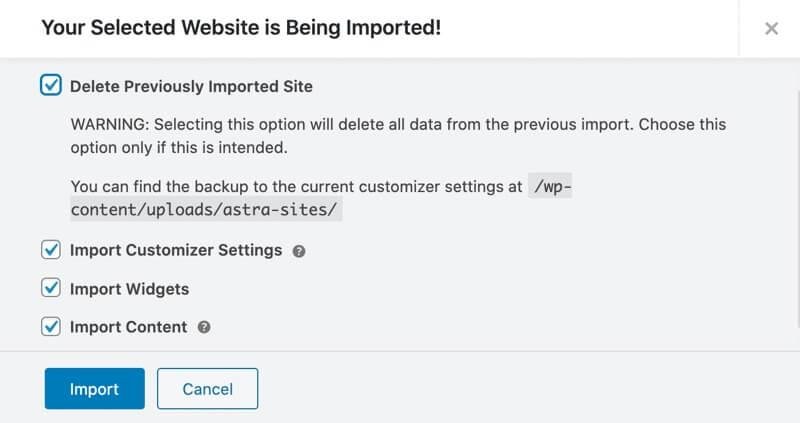
Give it a few minutes to complete. The pages you saw in the preview would also be created and published as part of this process. Once the import is done, you can go ahead and check your website.
Much of the work is automatically done, but you’ll probably want to make a few more changes to start a blog of your liking.
These will include adding your own logo and editing the content/images in the pages which were created from your starter template.
To change your sitewide settings, like the logo, you can go to Appearance > Customize. To edit content/images in pages or create new pages, keep reading.
Set up essential plugins
Plugins are small tools you can add to your WordPress blog to add extra features or improve performance without needing any coding skills. Think of plugins like apps for your smartphone—they help you customize and improve your blog quickly.
There are thousands of free and premium plugins available for WordPress. And you can always install or delete them later. But it’s a good idea to get started with a few of the essential ones as part of your blog setup process. Here’s what I recommend:
Rank Math – It helps improve your blog’s visibility on search engines. It guides you in optimizing each post for keywords, readability, and metadata, making it easier for readers to find your content.
Akismet – Akismet filters out spam comments automatically, which helps keep your blog looking clean and professional. It’s an essential tool to reduce the amount of manual moderation you’ll need to do.
Duplicate Page – Duplicate Page lets you quickly clone posts or pages, saving time when you want to reuse a layout or structure. It’s great for creating templates for posts or similar content.
WP Code Lite – WP Code Lite simplifies adding code snippets to your blog without needing to edit core theme files, which is helpful for customizations. Ideal for beginners starting a blog wanting safe, simple tweaks.
WPForms – PForms allows you to create custom contact forms easily, so readers can reach out to you. Its drag-and-drop interface makes it simple to design forms without coding skills.
To install a plugin, go to Plugins > Add New in your WordPress dashboard, search for the plugin, and click Install and then Activate.
Configure your must-have pages
WordPress gives you two options in the left sidebar menu to publish your content. It can be either as a post or a page.
So before we proceed further with building a blog or website, you need to understand what they are and how they differ from each other.
To see what pages or posts you already have on your blog/website, click Posts or Pages from the left sidebar menu in WordPress.
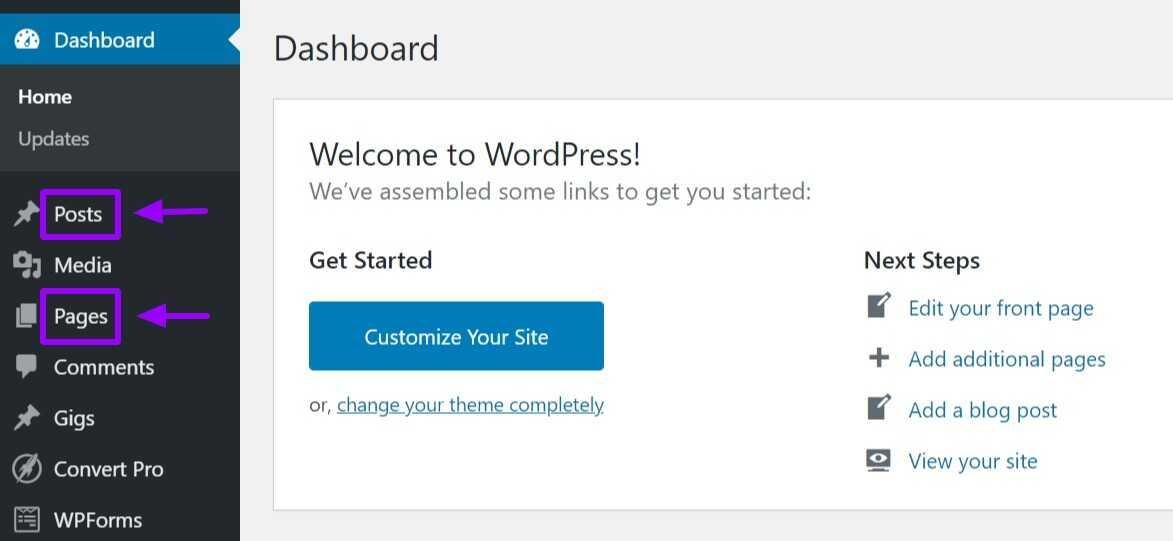
Technically speaking, both posts and pages refer to web pages, as in pages of your website. But the difference is this:
Post – When you publish a post (also known as a blog post), it’ll be part of your blog. If you recall from what we discussed at the beginning of this blog creation guide, a blog is a chronological collection of blog posts. So any post you create will become part of this collection.
Page – When you publish a page, it is a static webpage independent of your blog. People viewing your blog cannot access this page unless you link to this page from the main navigation menu of your blog or website.
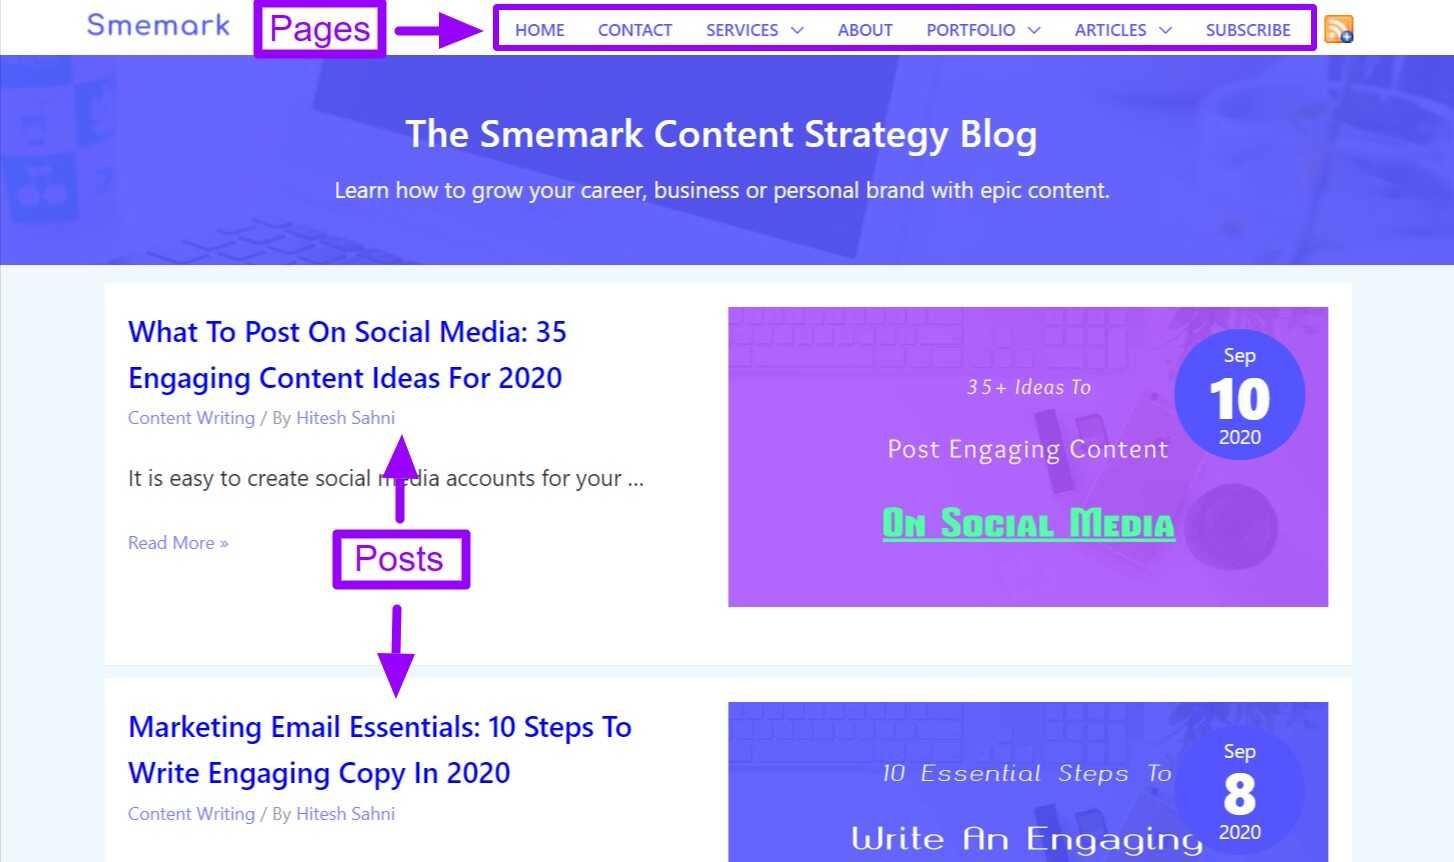
Now that you know the difference between posts and pages, let’s begin with your pages.
Apart from blog posts, every blog or website needs some essential pages for a good user experience. These include:
Homepage – This page welcomes people to your blog or website. It’s also the page you see when you preview your blog or website.
It could be your main blog page (which shows your blog posts in chronological order) or another page you created.
If you’re not seeing the correct page when you preview your website, WordPress lets you control which page will be set as your homepage.

In your WordPress dashboard, go to Settings > Reading. Here you can choose whether you want your homepage to show your latest blog posts, or one of the pages you created.
Blog page – As we discussed, this is a page showing your recent blog posts, while allowing the user to browse back in time as well.
About page – Explains what the blog or website is about, how it helps, and who is the person or team behind it.
Contact page – If you want your readers to be easily able to contact you, then this page cannot be skipped. It will usually also have a contact form.
Pages required by law – These pages assure readers that you’ll keep their information safe and private, and in what ways and why you collect it, if you do. The three must-have pages are: Privacy Policy, Disclaimer, and Terms Of Service.
Now, if you installed one of the Astra started templates as I showed above, some of these pages have already been created for you. And you can edit them further to add your own images or content.
From your left-sidebar menu in WordPress, go to Pages. You’ll get a list of all your pages. Then hover over a page you’d like to edit. Some extra options will appear, one of which is Edit.
Regarding the pages which you don’t have, you’ll have to create them from scratch. Go to Pages > Add New. You’ll get an editor window to add your page title and content. Once you’re done, click Publish.
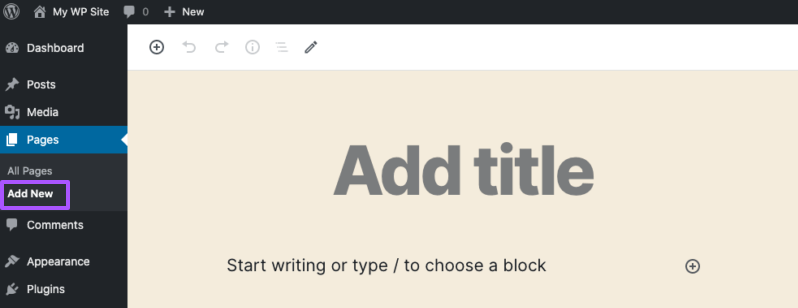
Also, note that just publishing the page will not make it accessible from your website. It needs to be a part of your navigation menu. To configure your website menu, go to Appearance > Menus.
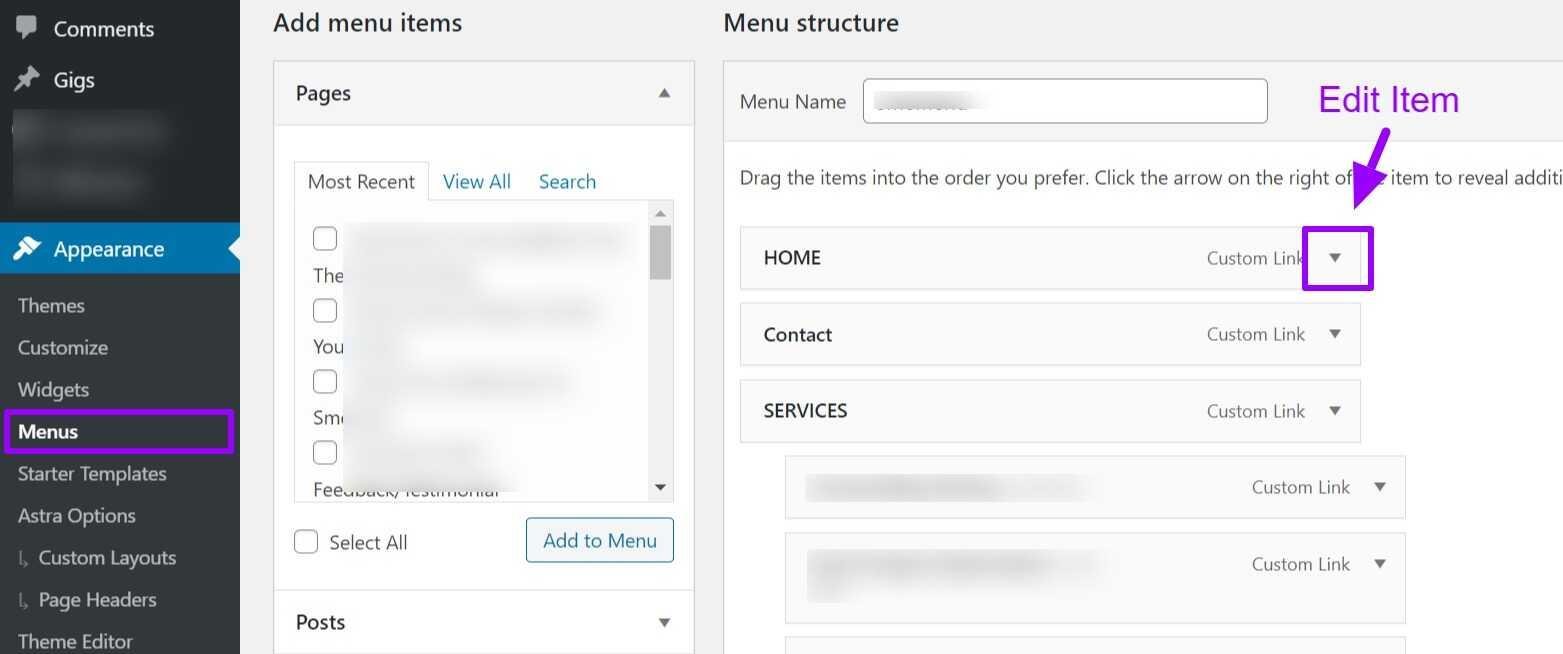
Here you can click on an existing menu item to edit it, or create a new one from the options available on the left.
In addition, you might want to link your pages in ways that make sense for your visitors and help them navigate.
Write your first blog post
Whoa! You made it through most of the technical stuff required to create a blog. So let’s get to writing your first post.
Once you have decided on a topic, the good news is that the process of editing and creating your blog posts is similar to what we discussed about pages.
Except for the fact that you’ll start from Posts > Add New, or Posts > Edit in the WordPress admin sidebar.
You’ll reach an editor where you can add the post’s title and content, then publish when done.
I have often seen beginners get stuck on what to write about. If you want your blog posts to get traffic, you can use keyword research tools to find topics that people are searching for.
These include Ubersuggest and Moz Keyword Planner. Need more inspiration? Check out my post on ways to generate content ideas.
Final thoughts on starting a blog
You have successfully started a blog and are ready to start writing and publishing content for your blog or website. As you do that, remember that writing excellent content and publishing at least once a week is the key to success.
So get as much content out as soon as possible. Set concrete goals and focus on being consistent in writing new posts.
It’s natural to feel overwhelmed in the beginning. And there’s a lot more to learn. But I promise if you push through the process, it’ll get easier and you’ll reap the rewards of building a blog.
Did we miss anything? Did you try these steps for starting a blog? Do you have any questions or comments? Share your thoughts below in the comments section.




Great guide! 🎉 Your step-by-step approach to starting a blog is super helpful for beginners. I especially liked your emphasis on choosing the right niche and understanding the audience. Thanks for making blogging seem so approachable!